Introduction
There are many ways to leather oars. We will describe one that works well for us, and requires no nails.
What you need:
• Leather (see below)
• Container of water
• Ball point pen that shows up on your leather
• Exacto knife
• Steel ruler
• Cutting surface
• Leather punch
• Whipping twine
• Two heavy needles (sail or canvas)
• Pliers
Leather
Recently we discovered the virtues of oiled and siliconed boot leather for making protective coverings for boat use. The leather is supple for its thickness, absorbs very little water, is easy to work with, and so far is wearing very well.
Preparation
First of all measure the length of the part you are covering. Find a piece of leather about the right length, and a bit wider than the circumference of the oar loom.
Measuring
Leather stretches when wet, and shrinks again when it dries. Each piece I have ever met was unique — sometimes even within the piece it behaves differently from one place to another. I have no idea how to predict how much a piece will stretch when wet. Take the sample piece, wet it and wrap it around the object to be covered. Mark the width needed for the leather to wrap almost all the way around. Leave a gap of 1/8" to 1/4". If the leather is stretchy or you are working with a piece several inches wide, leave a wider gap. If your object is narrow like a stanchion for example, leave a smaller gap. If the leather is going to have to curve in two directions, as it would when wrapping a ring or boom crutch, be sure to try your sample measuring piece over several inches of the object. That kind of shape needs more width than a simple cylinder, and you can have the edges almost butting together to start with.
Cutting
Using the steel ruler, cut one edge of the leather on the cutting surface. Wrap it around the object again, and check the marks for width. Cut the second edge and check it again. If the leather wraps around with the same size gap all the way, proceed to punching the holes for the twine. If not, measure and cut again until you have an even gap where the edges will face each other.
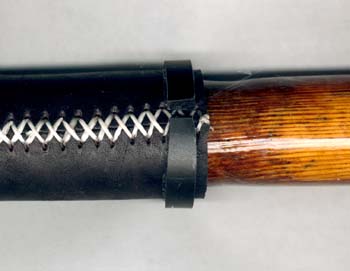
Punching the holes
I use the smallest punch on my leather punch to make holes for the twine. Mark lines of dots on the two seam edges of the leather, 1/8" in from the edges and 1/4" apart. Marks on the smooth side are easiest to see. Do this carefully with a ruler, so you get the same number of holes on both sides. Punch all the holes. Holes can also be bored in the drill press with a small bit.
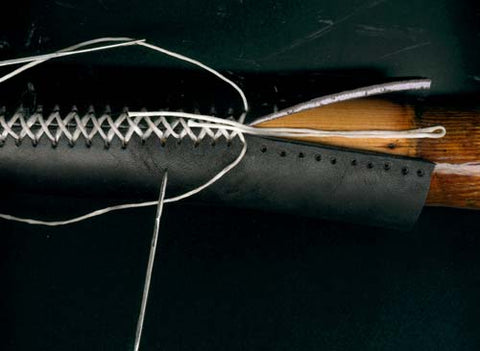
Stitching
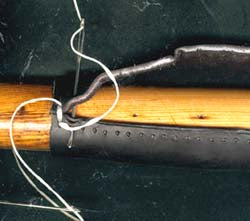
Cut a piece of waxed whipping twine four times the distance from your elbow to your fingertips. This may not be enough to complete the whole seam, but is about the maximum length to keep from tangling badly or getting frayed before the end of the job. Thread a sturdy needle onto each end. (Sailmaker's needles or canvas needles are good.)
Put your leather where you want it to be, and make sure it stays there until it is secured by the first few stitches.
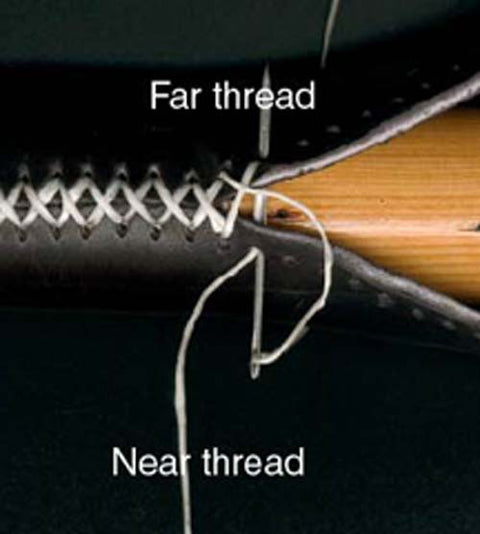
Start with a needle coming up through the first hole on each side. (Figure 1.)
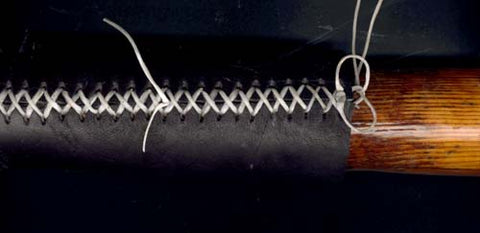
Take the needles across to the opposite holes, stitch down into the other hole, then up again on their original sides. You will have three strands next to the oar and two strands on top, with a needle coming out of the top of each first hole. Draw the thread up very tight. (Figure 2.)